torchao 快速上手#
详细介绍见博文:PyTorch Native Architecture Optimization: torchao。
安装
pip install torchao
推理#
推理量化算法适用于包含 nn.Linear 层的任意 PyTorch 模型。您可以使用顶级的 quantize_ api 选择仅权重量化和各种数据类型及稀疏布局的动态激活量化。
from torchao.quantization import (
    quantize_,
    int4_weight_only,
)
quantize_(model, int4_weight_only())
有时量化一层可能会因为开销变慢,如果希望选择模型中每一层的量化方式,那么你可以改用
model = torchao.autoquant(torch.compile(model, mode='max-autotune'))
quantize_ API 会根据你的模型是计算受限还是内存受限,提供几种不同的选项。
from torchao.quantization import (
    # Memory bound models
    int4_weight_only,
    int8_weight_only,

    # Compute bound models
    int8_dynamic_activation_int8_semi_sparse_weight,
    int8_dynamic_activation_int8_weight,

    # Device capability 8.9+
    float8_weight_only,
    float8_dynamic_activation_float8_weight,
)
与 HuggingFace diffusers 团队合作的 diffusers-torchao 中进行了大量的扩散模型基准测试,结果显示在 Flux.1-Dev 上实现了 \(53.88\%\) 的加速,在 CogVideoX-5b 上实现了 \(27.33\%\) 的加速。
API 是可组合的,因此例如将稀疏性和量化组合起来,为 ViT-H 推理带来了 \(5\%\) 的加速。
还可以将权重量化为 int4,将 kv 缓存量化为 int8,以支持在 128K 上下文长度下使用不到 18.9GB 的 VRAM 运行 Llama 3.1 8B 模型。
QAT 量化训练#
后训练量化,尤其是在低于 4 位的情况下,可能会遭受严重的准确率下降。通过使用量化感知训练(QAT),成功地在 hellaswag 数据集上恢复了高达 \(96\%\) 的准确率下降。已在 torchtune 中将此集成为了一端到端的解决方案,并附带了简短的教程。
训练#
低精度计算和通信#
torchao 提供了易于使用的端到端工作流,用于降低训练计算和分布式通信的精度,从 torch.nn.Linear 层的 float8 开始。以下是将训练运行中的计算 GEMM 转换为 float8 的一行代码:
from torchao.float8 import convert_to_float8_training
convert_to_float8_training(model)
要查看如何通过使用 float8 将 LLaMa 3 70B 的预训练速度提高至多 1.5 倍的端到端示例,请参阅 README,以及 torchtitan 的博客和 float8 配方。
LLaMa 3 70B 浮点 8 位预训练与 bfloat16 的性能和准确性对比#

扩展训练工作流以支持更多的数据类型和布局
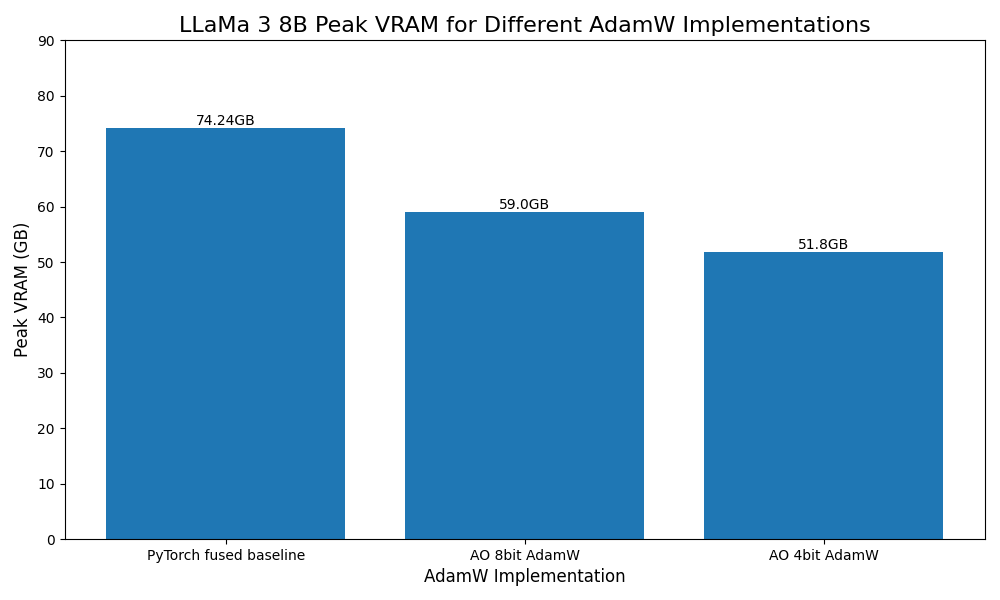
低比特优化器#
受 Bits and Bytes 的启发,还为 8 位和 4 位优化器添加了原型支持,作为 AdamW 的即插即用替代品。
from torchao.prototype.low_bit_optim import AdamW8bit, AdamW4bit
optim = AdamW8bit(model.parameters())
集成#
torchao 能够在开源项目中的一些最重要项目中正常工作
Huggingface transformers 作为推理后端
在 diffusers-torchao 中作为加速扩散模型的参考实现
在 HQQ 中进行快速 4 bit 推理
在
torchtune中进行 PyTorch 原生 QLoRA 和 QAT 食谱在
torchchat中进行后训练量化在 SGLang 中进行 int4 和 int8 后训练量化
量化示例#
torchao 中量化的主入口点是 quantize_ API。此函数会原地修改你的模型,根据用户配置插入自定义的量化逻辑。本指南中的所有代码都可以在示例脚本中找到。
首先,设置玩具模型:
import copy
import torch

class ToyLinearModel(torch.nn.Module):
    def __init__(self, m: int, n: int, k: int):
        super().__init__()
        self.linear1 = torch.nn.Linear(m, n, bias=False)
        self.linear2 = torch.nn.Linear(n, k, bias=False)

    def forward(self, x):
        x = self.linear1(x)
        x = self.linear2(x)
        return x

model = ToyLinearModel(1024, 1024, 1024).eval().to(torch.bfloat16).to("cuda")

# Optional: compile model for faster inference and generation
model = torch.compile(model, mode="max-autotune", fullgraph=True)
model_bf16 = copy.deepcopy(model)
现在调用主要的量化 API,将模型中的线性权重原地量化为 int4。具体来说,这应用了基于 uint4 仅权重非对称分组量化,并利用 tinygemm int4mm CUDA 内核进行高效的混合数据类型矩阵乘法:
# torch 2.4+ only
from torchao.quantization import Int4WeightOnlyConfig, quantize_
quantize_(model, Int4WeightOnlyConfig(group_size=32))
现在,量化后的模型已经准备好使用了!请注意,量化逻辑是通过张量子类插入的,因此模型的整体结构没有变化;只有权重张量被更新,但 nn.Linear 模块仍然保持为 nn.Linear 模块:
model.linear1
model.linear2
首先,验证 int4 量化模型大约是原 bfloat16 模型大小的四分之一:
import os
import tempfile
from pathlib import Path
temp_dir = Path(".temp")
temp_dir.mkdir(parents=True, exist_ok=True)
with tempfile.TemporaryDirectory(dir=temp_dir) as tmpdirname:
    torch.save(model, f"{tmpdirname}/int4_model.pt")
    torch.save(model_bf16, f"{tmpdirname}/bfloat16_model.pt")
    int4_model_size_mb = os.path.getsize(f"{tmpdirname}/int4_model.pt") / 1024 / 1024
    bfloat16_model_size_mb = os.path.getsize(f"{tmpdirname}/bfloat16_model.pt") / 1024 / 1024
    print(f"int4 model size: {int4_model_size_mb:.2f} MB")
    print(f"bfloat16 model size: {bfloat16_model_size_mb:.2f} MB")
接下来,演示量化模型不仅更小,而且还要快得多!
from torchao.utils import (
    TORCH_VERSION_AT_LEAST_2_5,
    benchmark_model,
    unwrap_tensor_subclass,
)

# Temporary workaround for tensor subclass + torch.compile
# Only needed for torch version < 2.5
if not TORCH_VERSION_AT_LEAST_2_5:
    unwrap_tensor_subclass(model)

num_runs = 100
torch._dynamo.reset()
example_inputs = (torch.randn(1, 1024, dtype=torch.bfloat16, device="cuda"),)
bf16_time = benchmark_model(model_bf16, num_runs, example_inputs)
int4_time = benchmark_model(model, num_runs, example_inputs)

print("bf16 mean time: %0.3f ms" % bf16_time)
print("int4 mean time: %0.3f ms" % int4_time)
print("speedup: %0.1fx" % (bf16_time / int4_time))
在单块带有 80GB 内存的 A100 GPU 上,这会打印:
bf16 mean time: 30.393 ms
int4 mean time: 4.410 ms
speedup: 6.9x
PyTorch Export 量化#
PyTorch 2 Export 量化是一种全图量化工作流,主要用于静态量化。它针对需要输入和输出激活以及权重进行量化的硬件,并依赖于识别算子模式来做出量化决策(例如 linear - relu)。PT2E 量化会在操作周围插入量化和反量化算子,并在 lowering 过程中将量化算子模式融合为实际的量化算子。目前有两种典型的降低路径:
通过 inductor lowering 的
torch.compile通过委托的 ExecuTorch
展示使用 X86InductorQuantizer 的示例
import torch
from torchao.quantization.pt2e.quantize_pt2e import prepare_pt2e
from torch.export import export
from torchao.quantization.pt2e.quantizer.x86_inductor_quantizer import (
    X86InductorQuantizer,
    get_default_x86_inductor_quantization_config,
)

class M(torch.nn.Module):
    def __init__(self):
        super().__init__()
        self.linear = torch.nn.Linear(5, 10)

    def forward(self, x):
       return self.linear(x)

# initialize a floating point model
float_model = M().eval()

# define calibration function
def calibrate(model, data_loader):
    model.eval()
    with torch.no_grad():
        for image, target in data_loader:
            model(image)

# Step 1. program capture
m = export(float_model, *example_inputs).module()
# we get a model with aten ops

# Step 2. quantization
# backend developer will write their own Quantizer and expose methods to allow
# users to express how they
# want the model to be quantized
quantizer = X86InductorQuantizer()
quantizer.set_global(xiq.get_default_x86_inductor_quantization_config())

# or prepare_qat_pt2e for Quantization Aware Training
m = prepare_pt2e(m, quantizer)

# run calibration
# calibrate(m, sample_inference_data)
m = convert_pt2e(m)

# Step 3. lowering
# lower to target backend

# Optional: using the C++ wrapper instead of default Python wrapper
import torch._inductor.config as config
config.cpp_wrapper = True

with torch.no_grad():
    optimized_model = torch.compile(converted_model)

    # Running some benchmark
    optimized_model(*example_inputs)